
External connections manager
Introduction
Section titled “Introduction”This user guide enables data consumers and providers to conveniently establish and oversee their data links or connections, essential for conducting data transfers.
Users have the option to use either free connection slots or purchase more connection slots and configure their preferred storage setups, such as SFTP servers or Object storages such as Amazon S3 or Azure Blob Storage.
This feature empowers users with the flexibility to centrally manage their connections, applicable across all dataspaces within the Telekom Data Intelligence Hub, of which they are members.
For SFTP Servers
Section titled “For SFTP Servers”Create your external connections
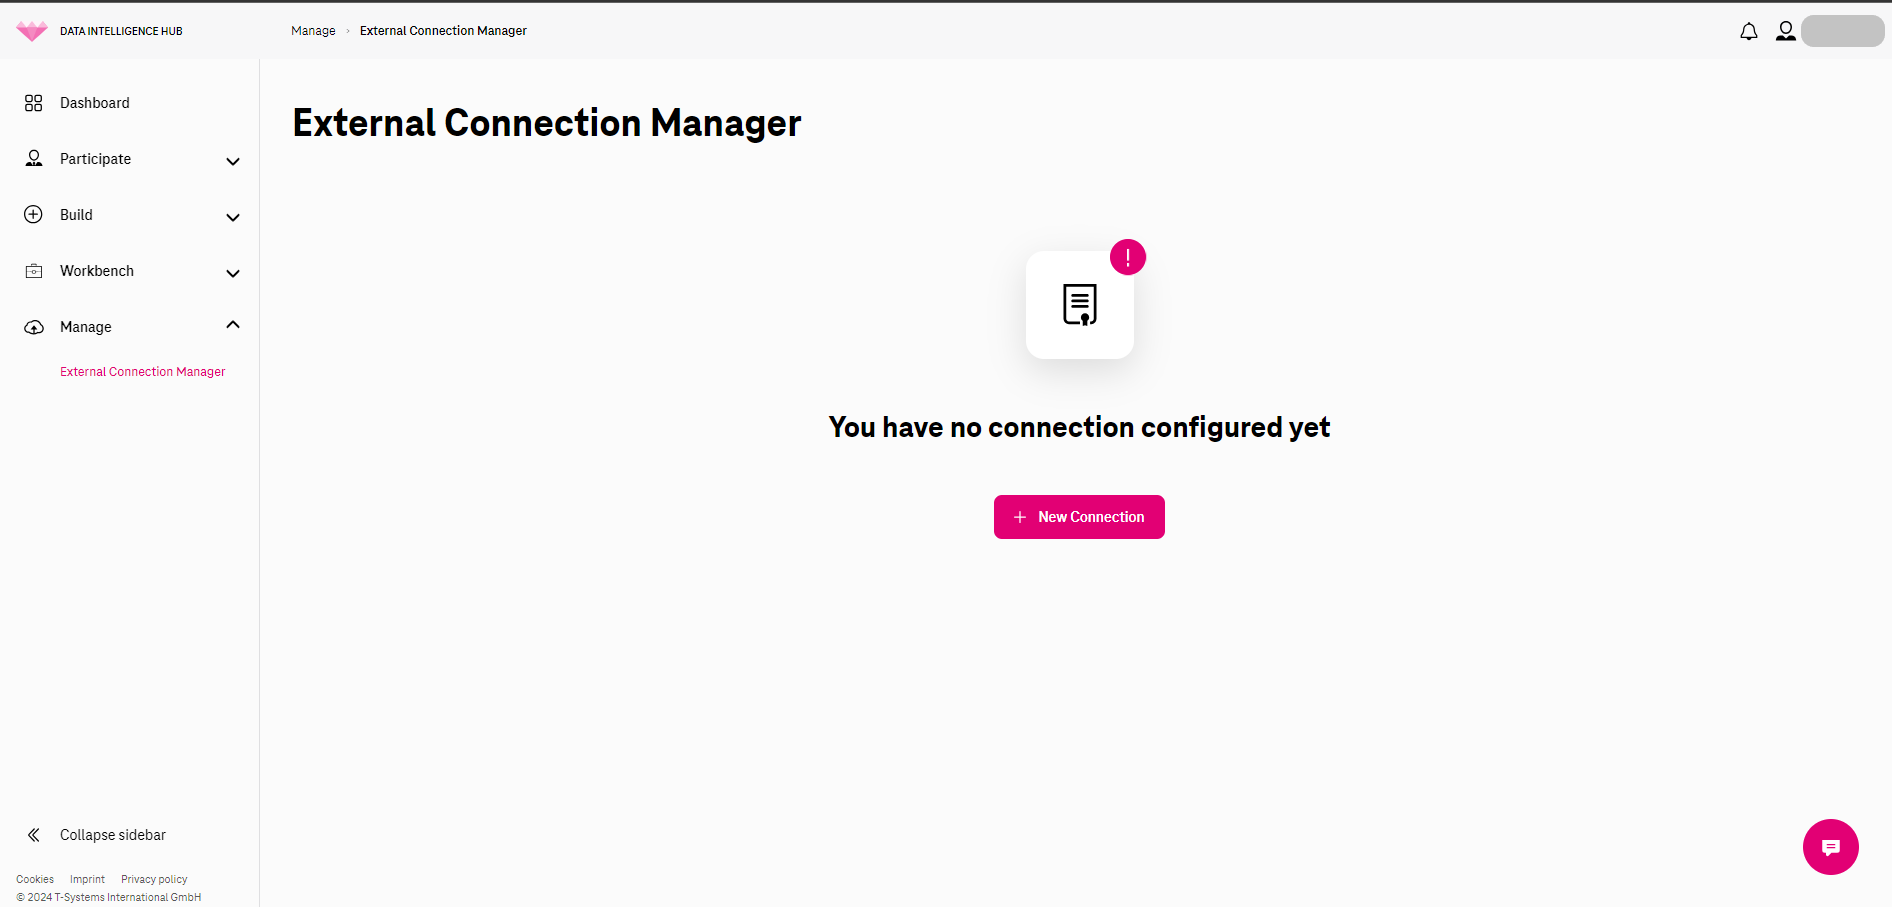
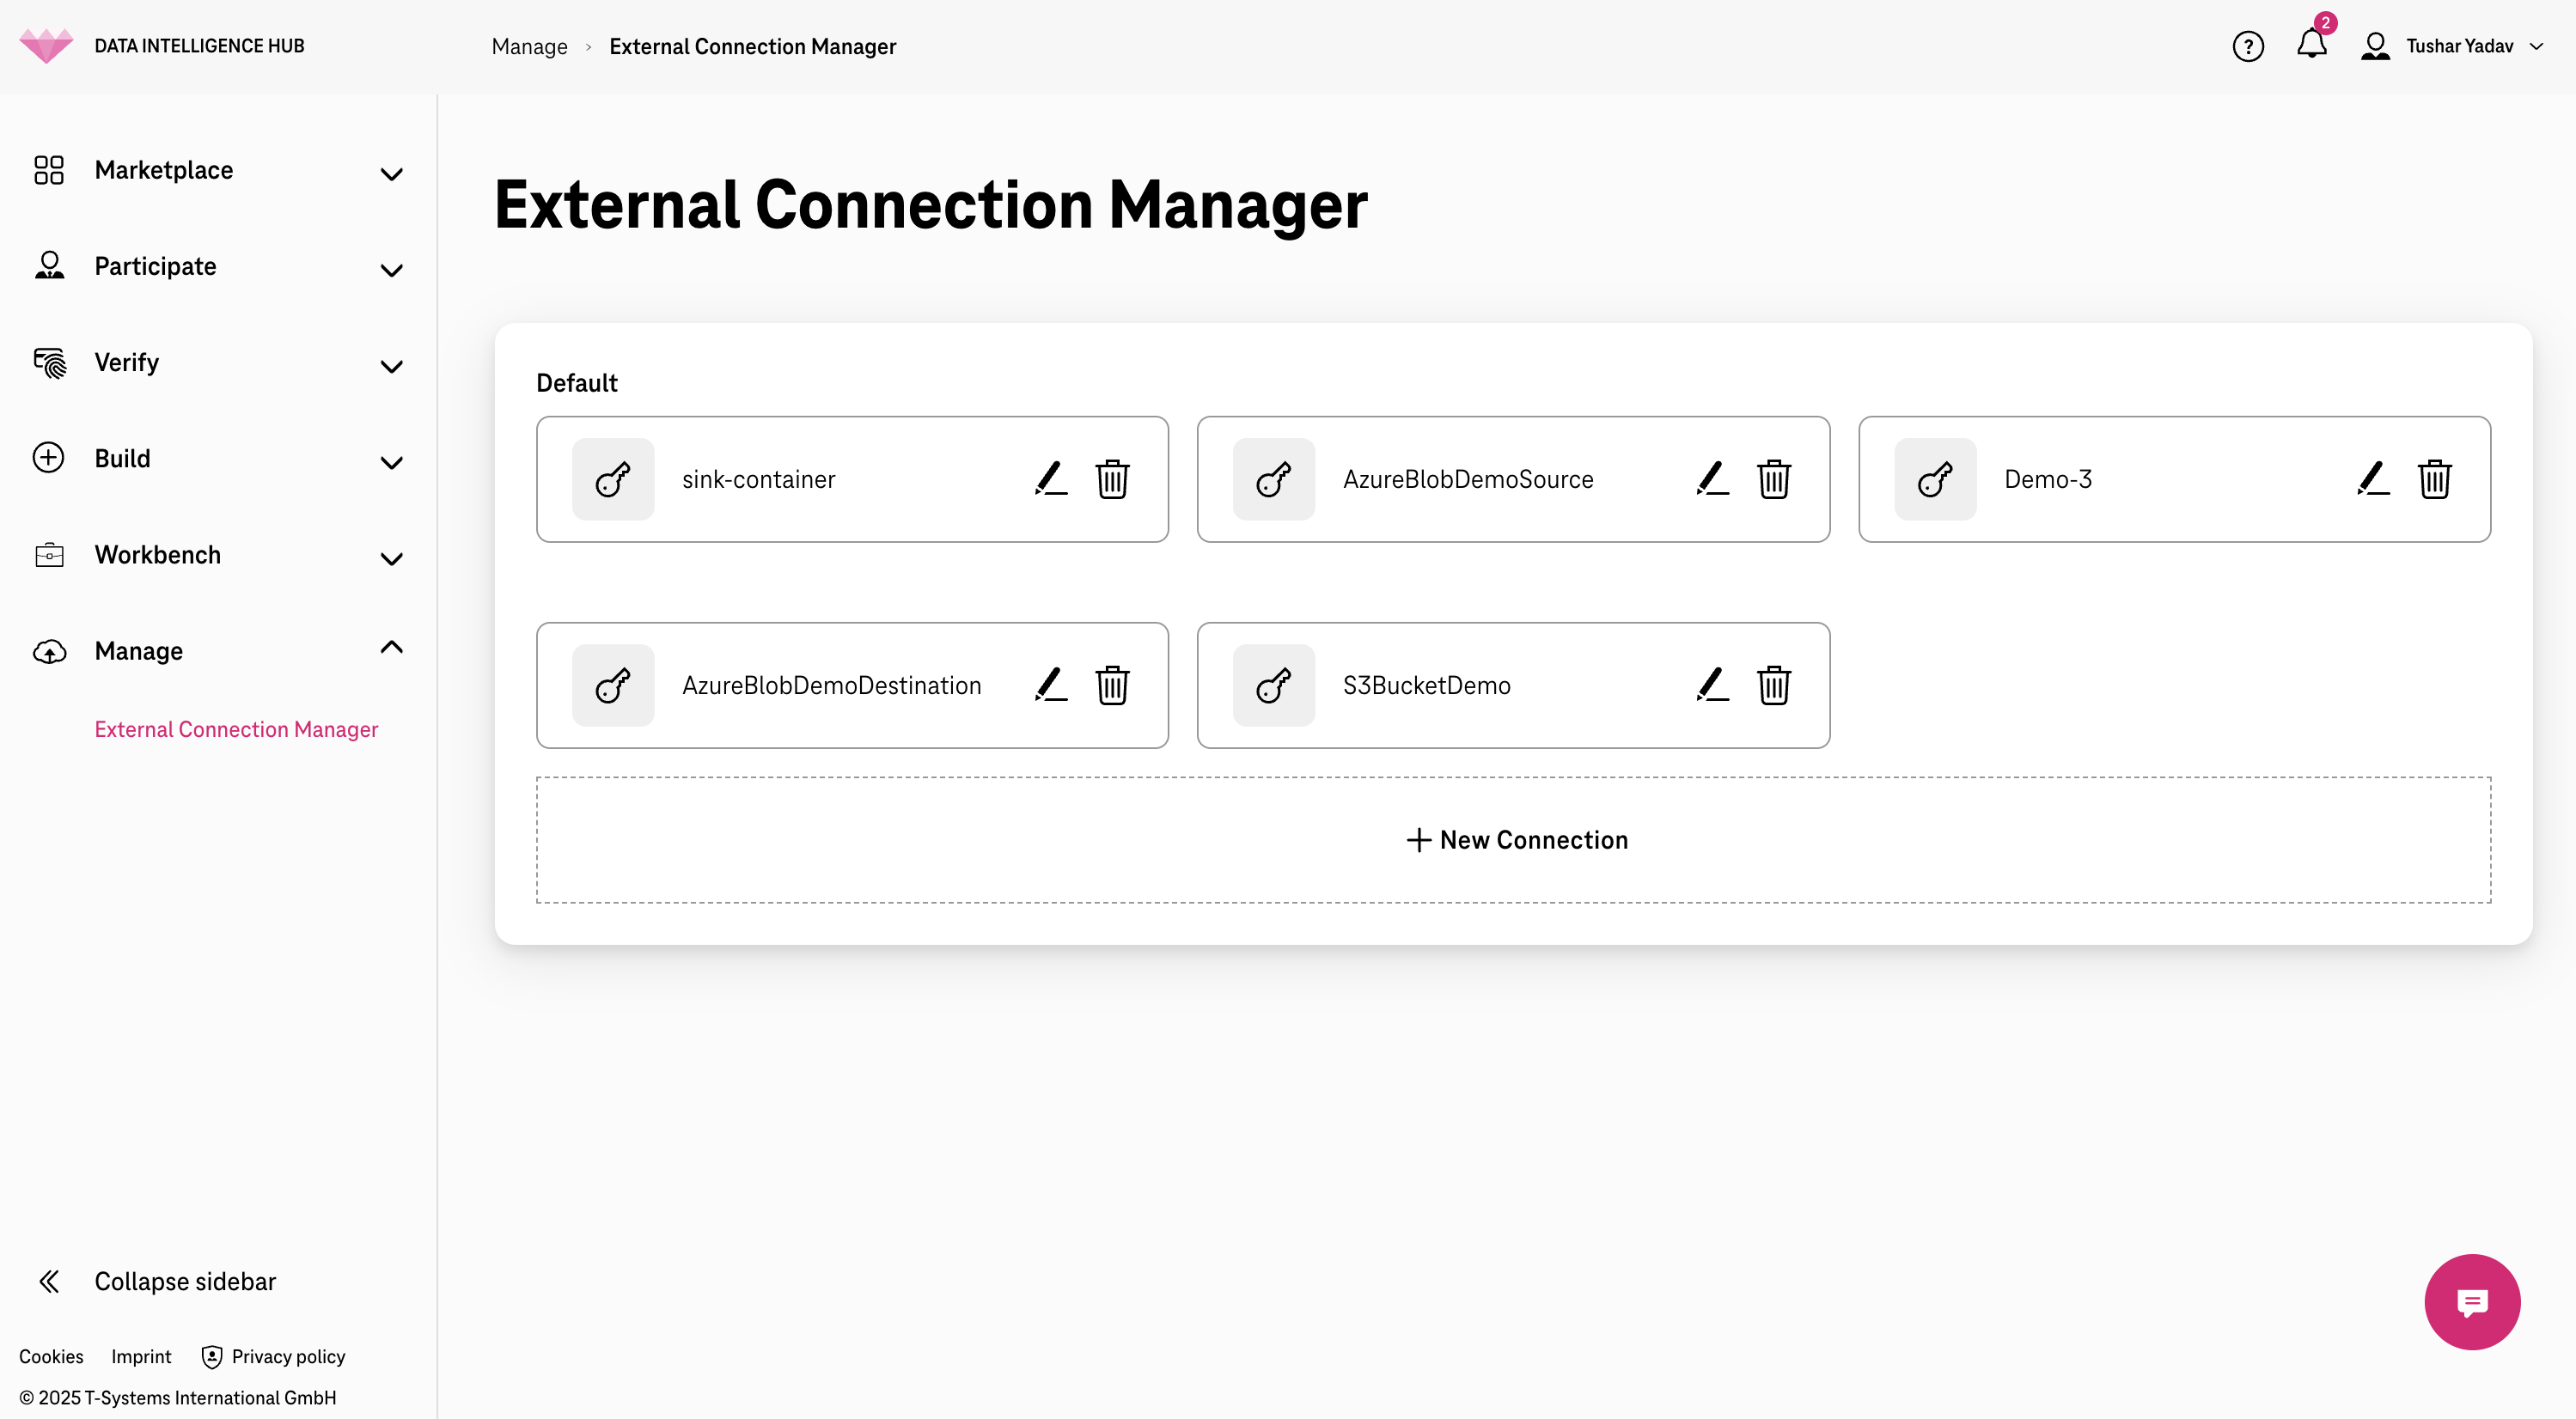
Section titled “Create your external connections”- Navigate to “Manage” section and click on “New Connection”. Here you can view all the connections that have been defined by various users of your organization.
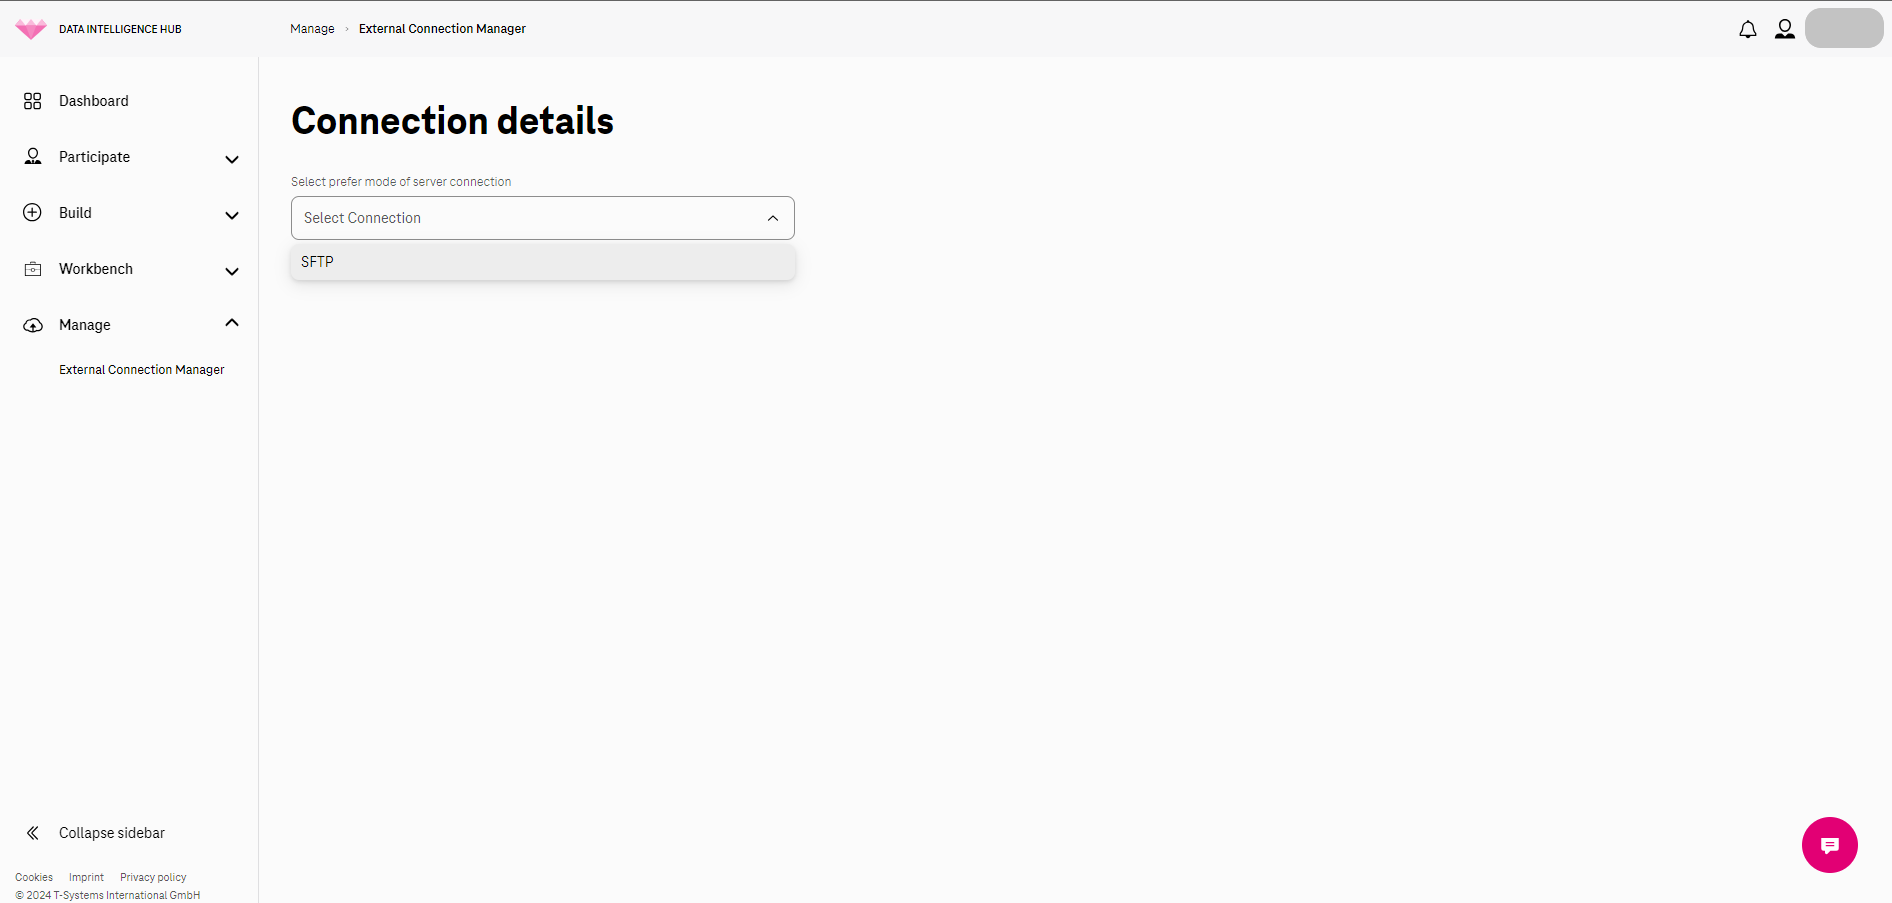
- From the given dropdown, select your preferred type server connection. In this example, we will select “SFTP” connection and define it in next steps.
Configure your external connection
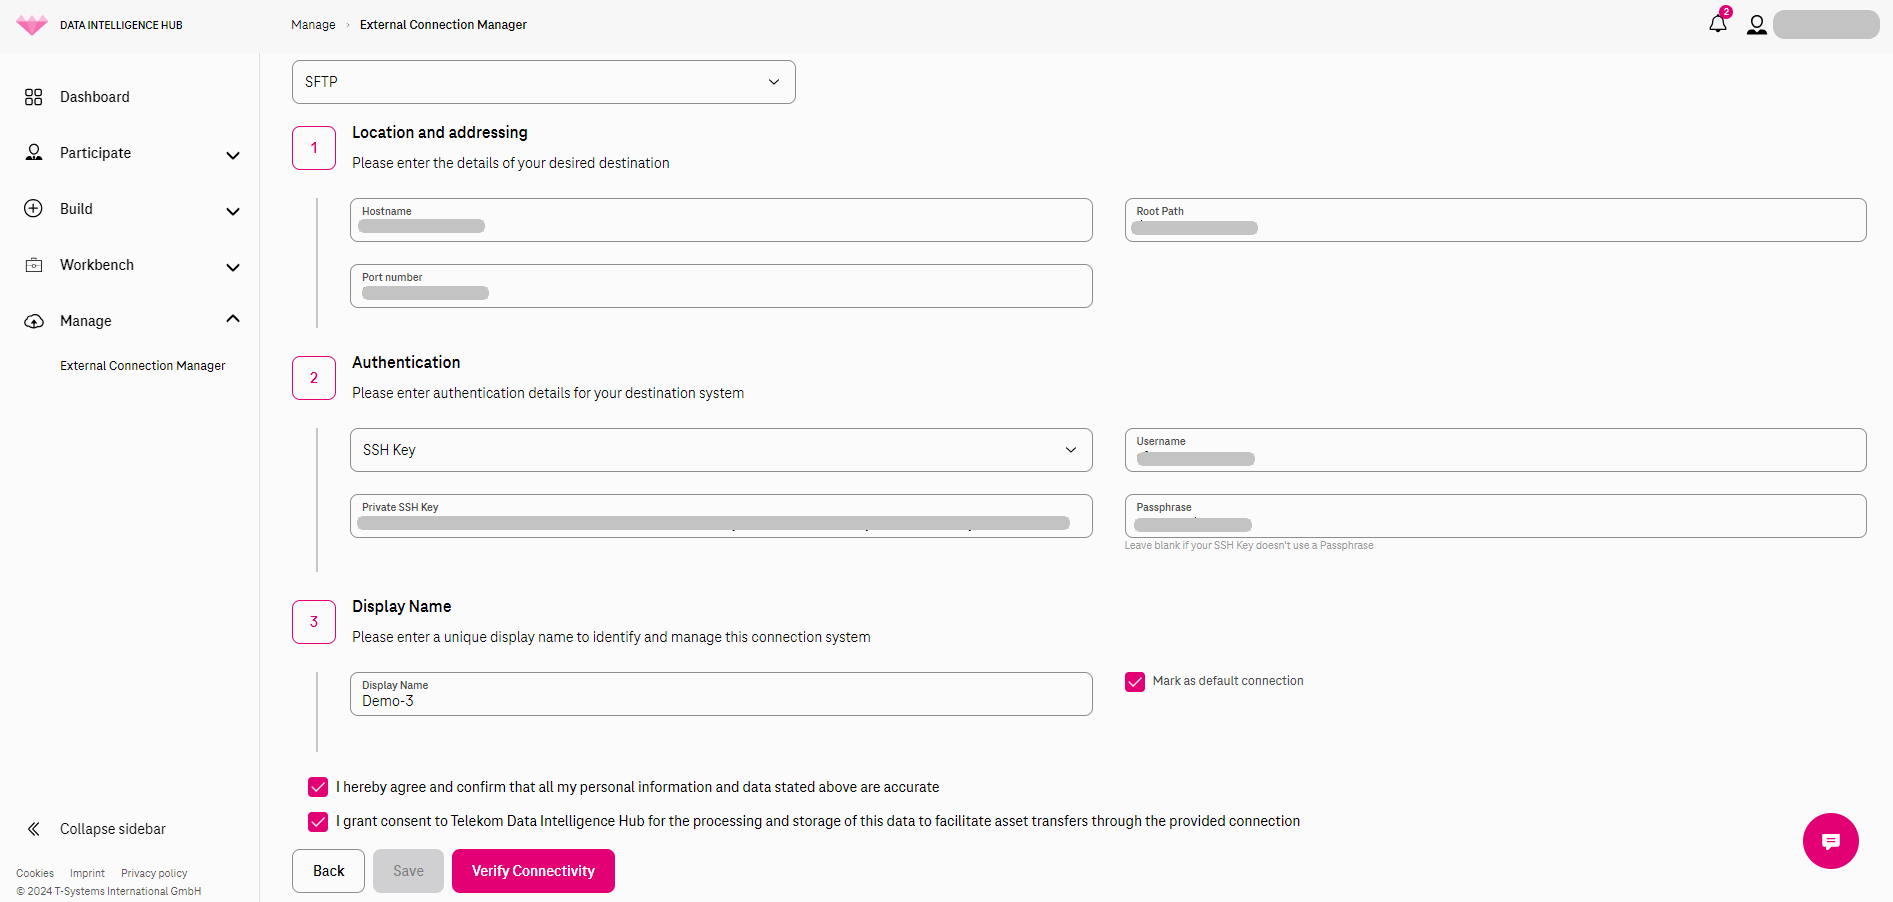
Section titled “Configure your external connection”- Once the connection type is selected, you will be able to view a form, which requires several fields to be filled up in order to define the connection system fully. These details are necessary for Telekom Data Intelligence Hub to establish connectivity so that successful data transfers can take place.
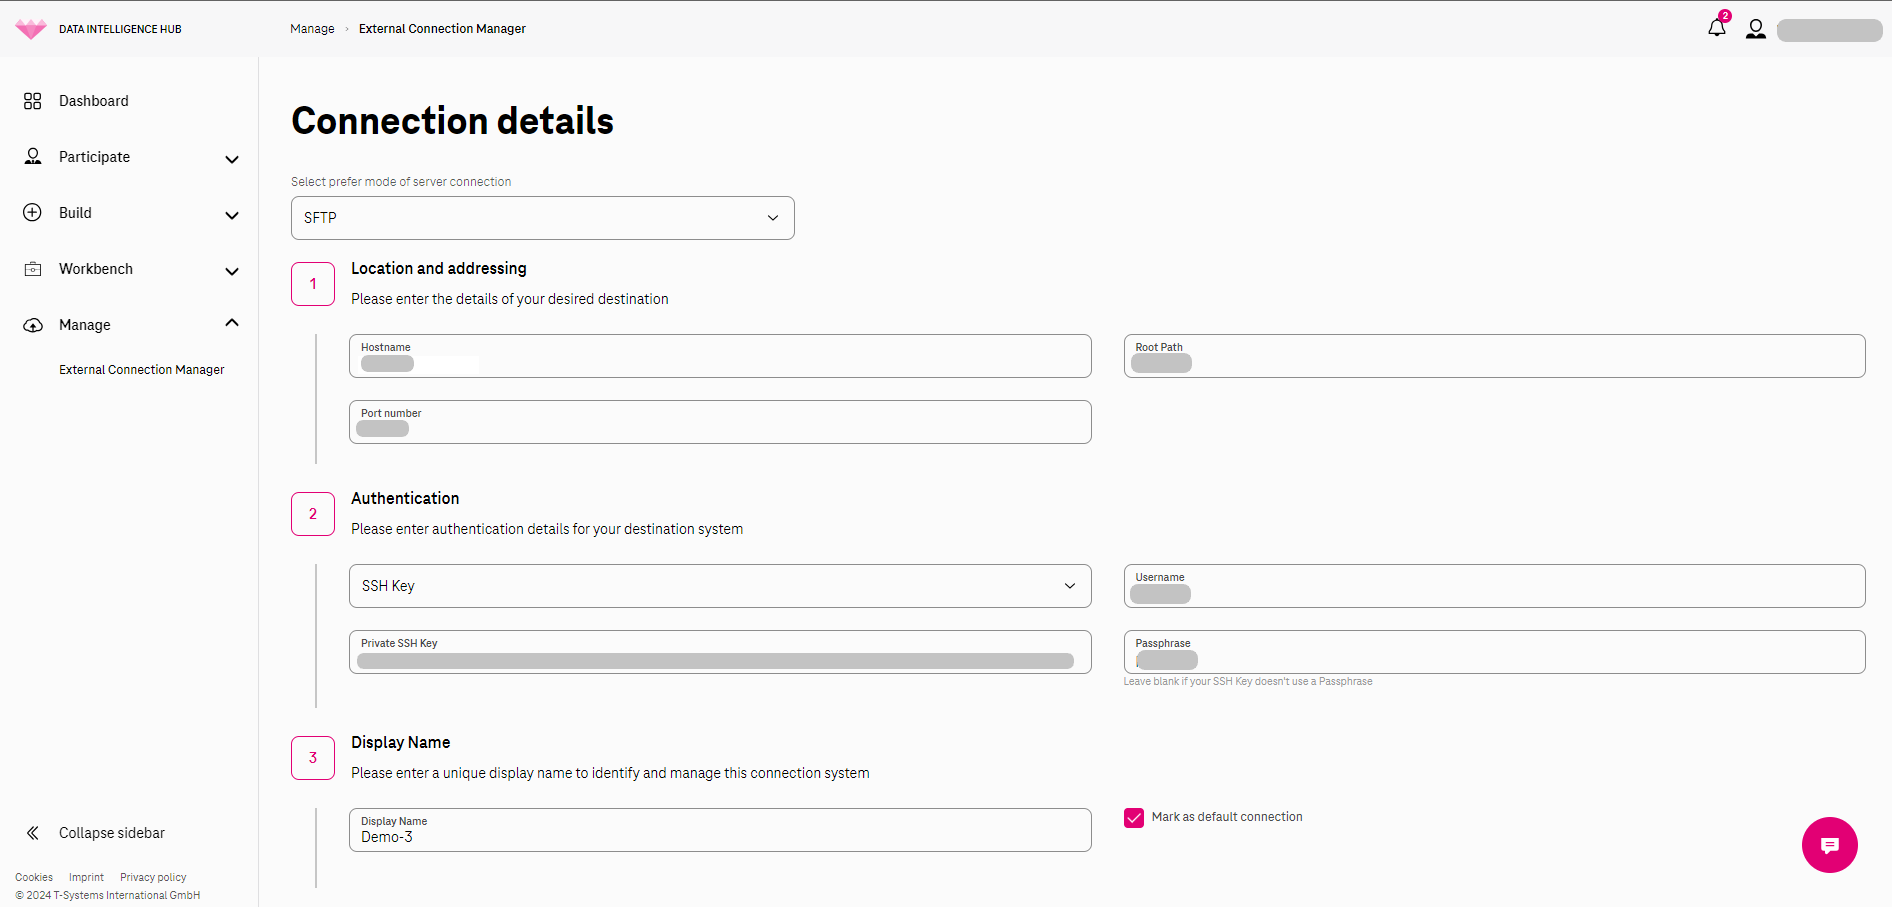
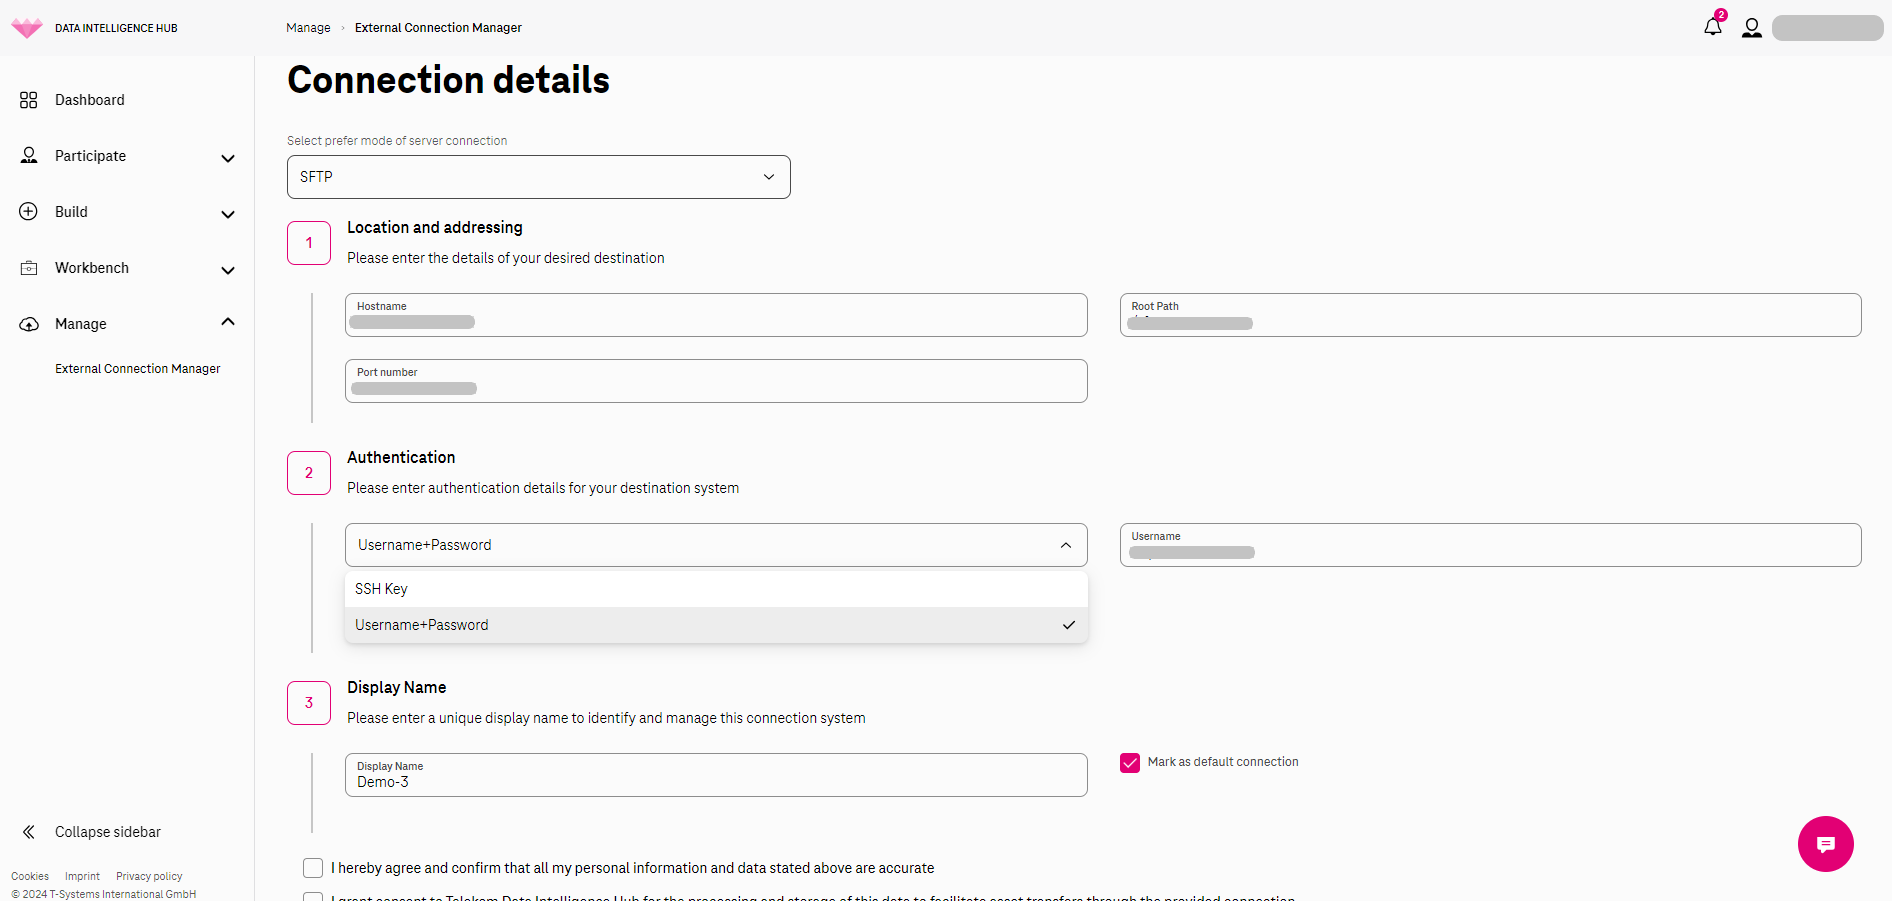
- Section 1 requests information for the location of the connection to be configured. In the current example of SFTP type connection, the fields you can see is “Hostname”, “Rootpath”, and “Port number” of the SFTP storage system. Section 2 requires authentication details. This could be either “SSH Key” based authentication or “Username and Password” based. Depending on type of connection, the flexibility in authentication options could be seen here. Now enter the requested details of your SFTP storage system.
-
Finally, you can opt to designate a unique “Display name” for this connection, facilitating its differentiation from other connections set up within your organization account. It’s crucial to recognize that these connections are available to any user within your organization. Additionally, you have the choice to designate this connection as the default, aiding to swift selection for future usage.
-
Please check the checkboxes below to confirm and save this connection for your organization account. These selections are mandatory and necessary to obtain user consent for storing and processing the connection details.
Verify and add/save your connection
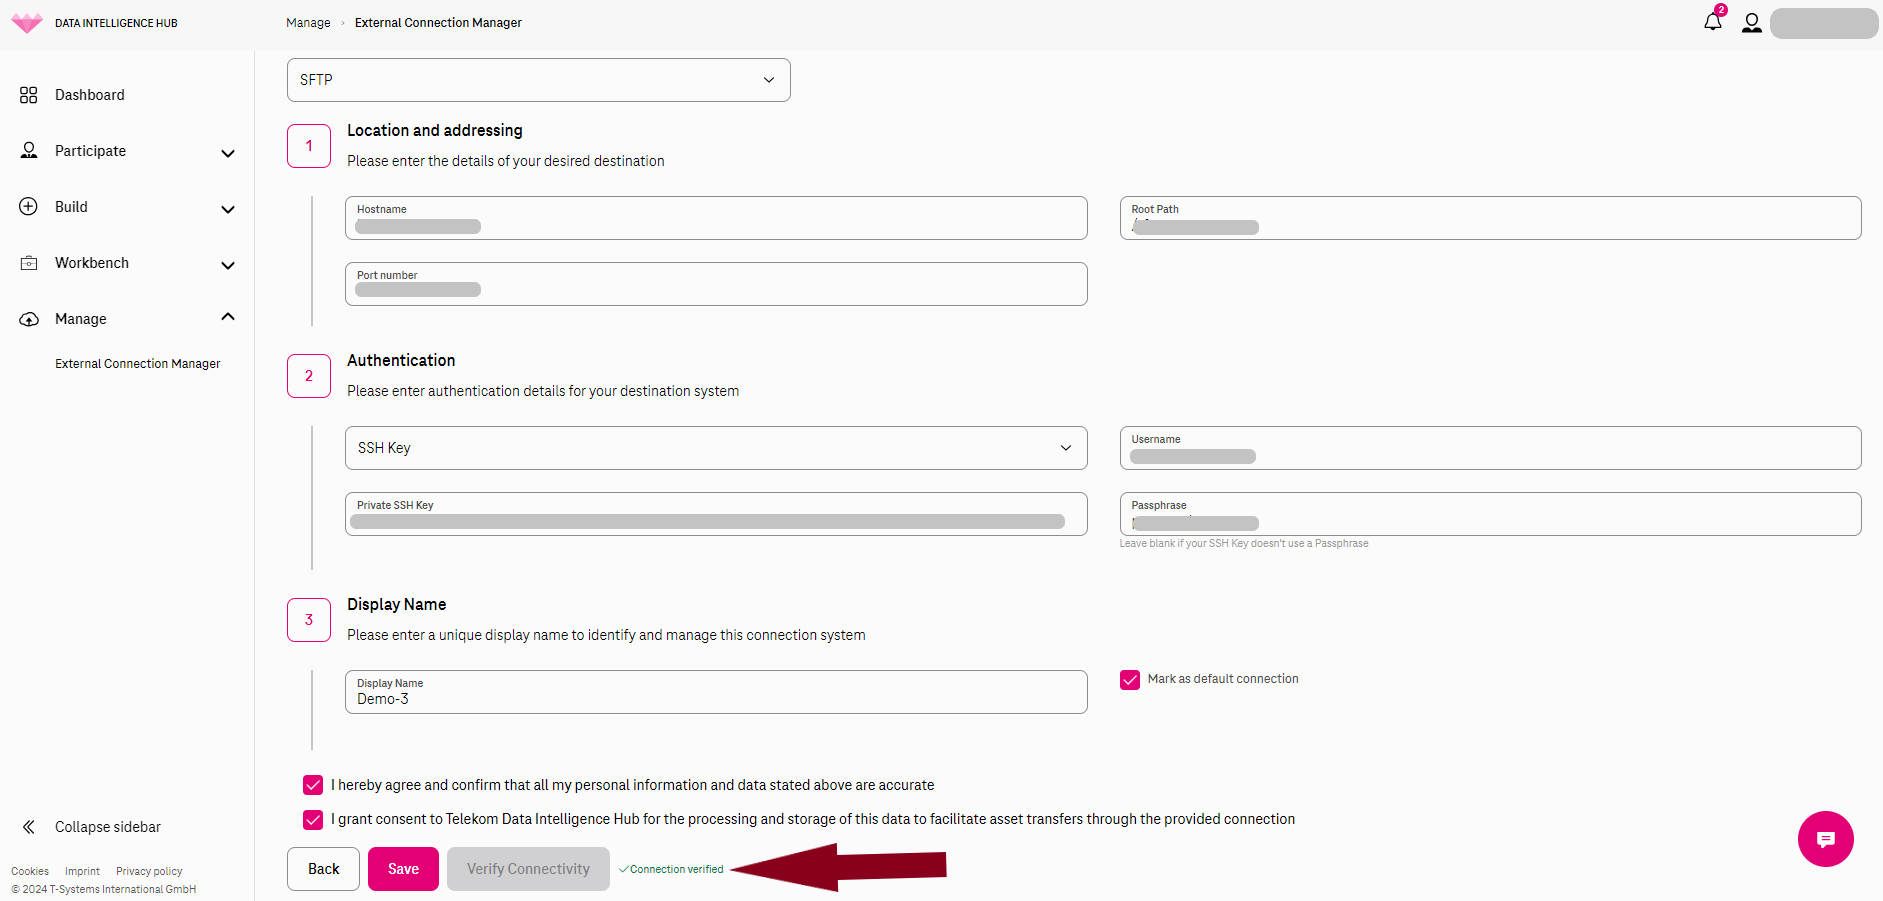
Section titled “Verify and add/save your connection”- Upon clicking “Verify,” we will assess the reachability to your configured connection. Only upon successful verification will users be able to “Add” or “Save” this connection for future use. Once you can see “Connection verified”, please click on “Add” (while adding new connection) or “Save” (while editing exisiting connection) to save the connection.
-
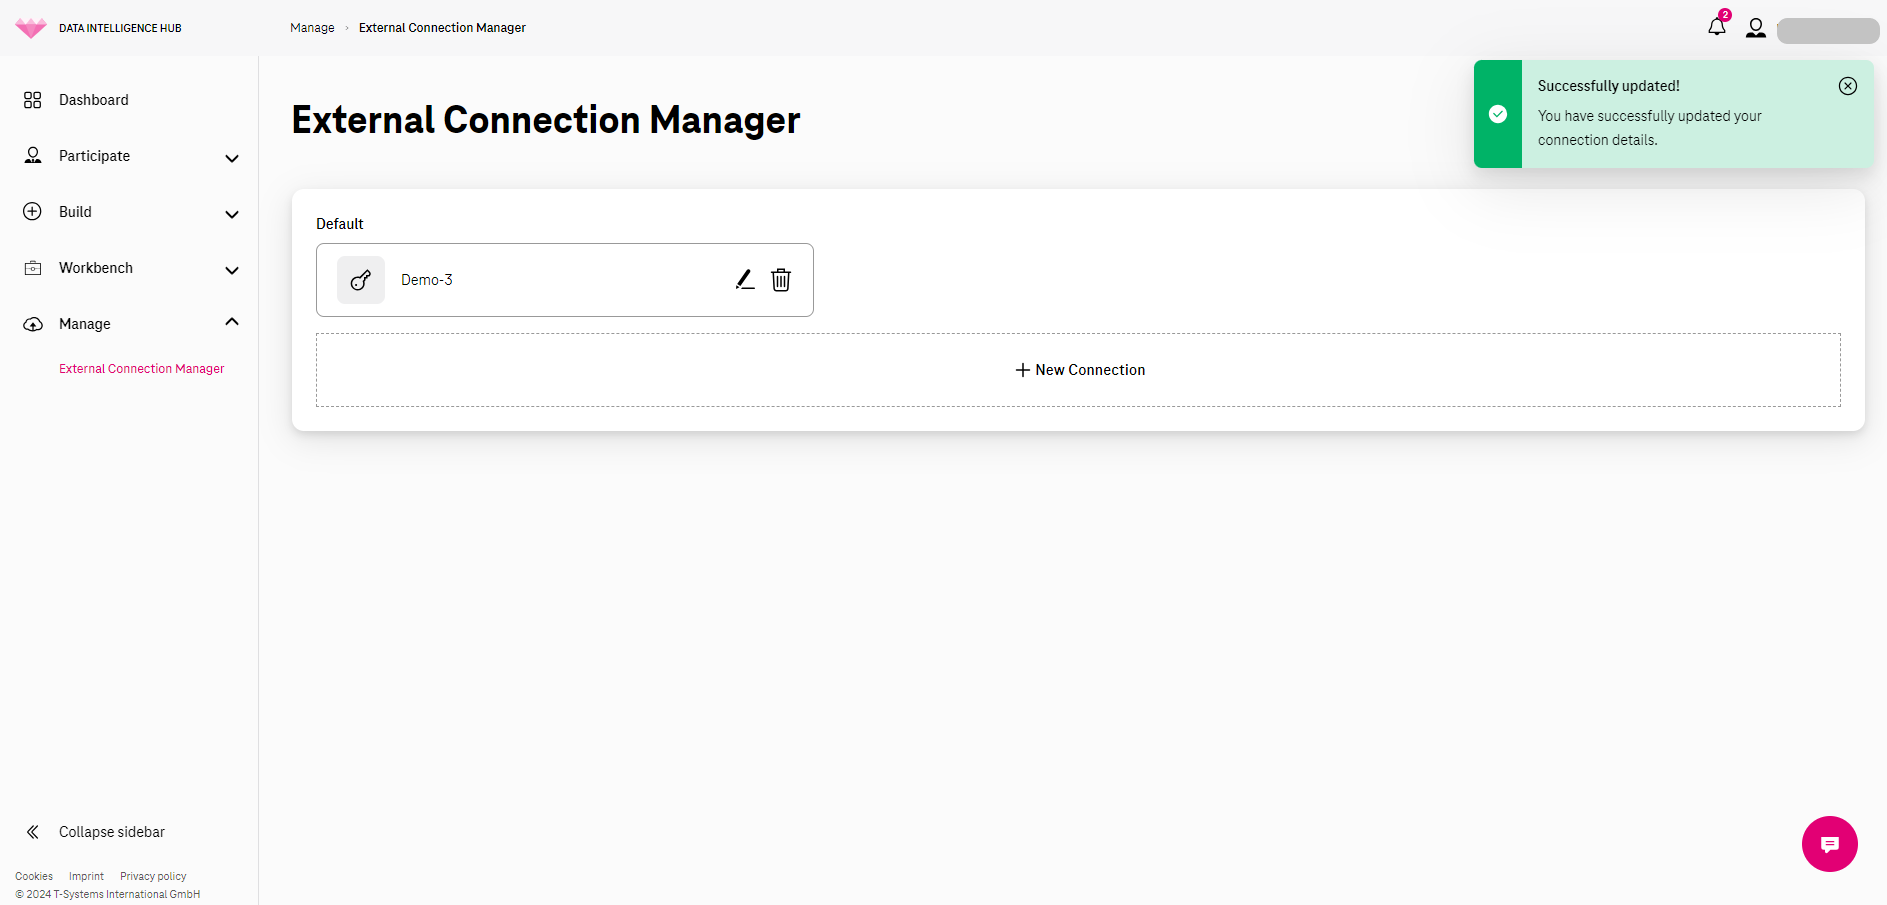
You can now see the connection in the overview page and a “success” notification. Now this connection is ready to use for data transfers.
-
You can also “delete” or “edit” any connection from this overview page.
For Amazon S3 Object Storage
Section titled “For Amazon S3 Object Storage”Create your external connections
Section titled “Create your external connections”Navigate to “Manage” section and click on “New Connection”. Here you can view all the connections that have been defined by various users of your organization.
From the given dropdown, select your preferred type server connection. In this example, we will select “Amazon S3” connection and define and configure it in next steps.
Configure your external connection
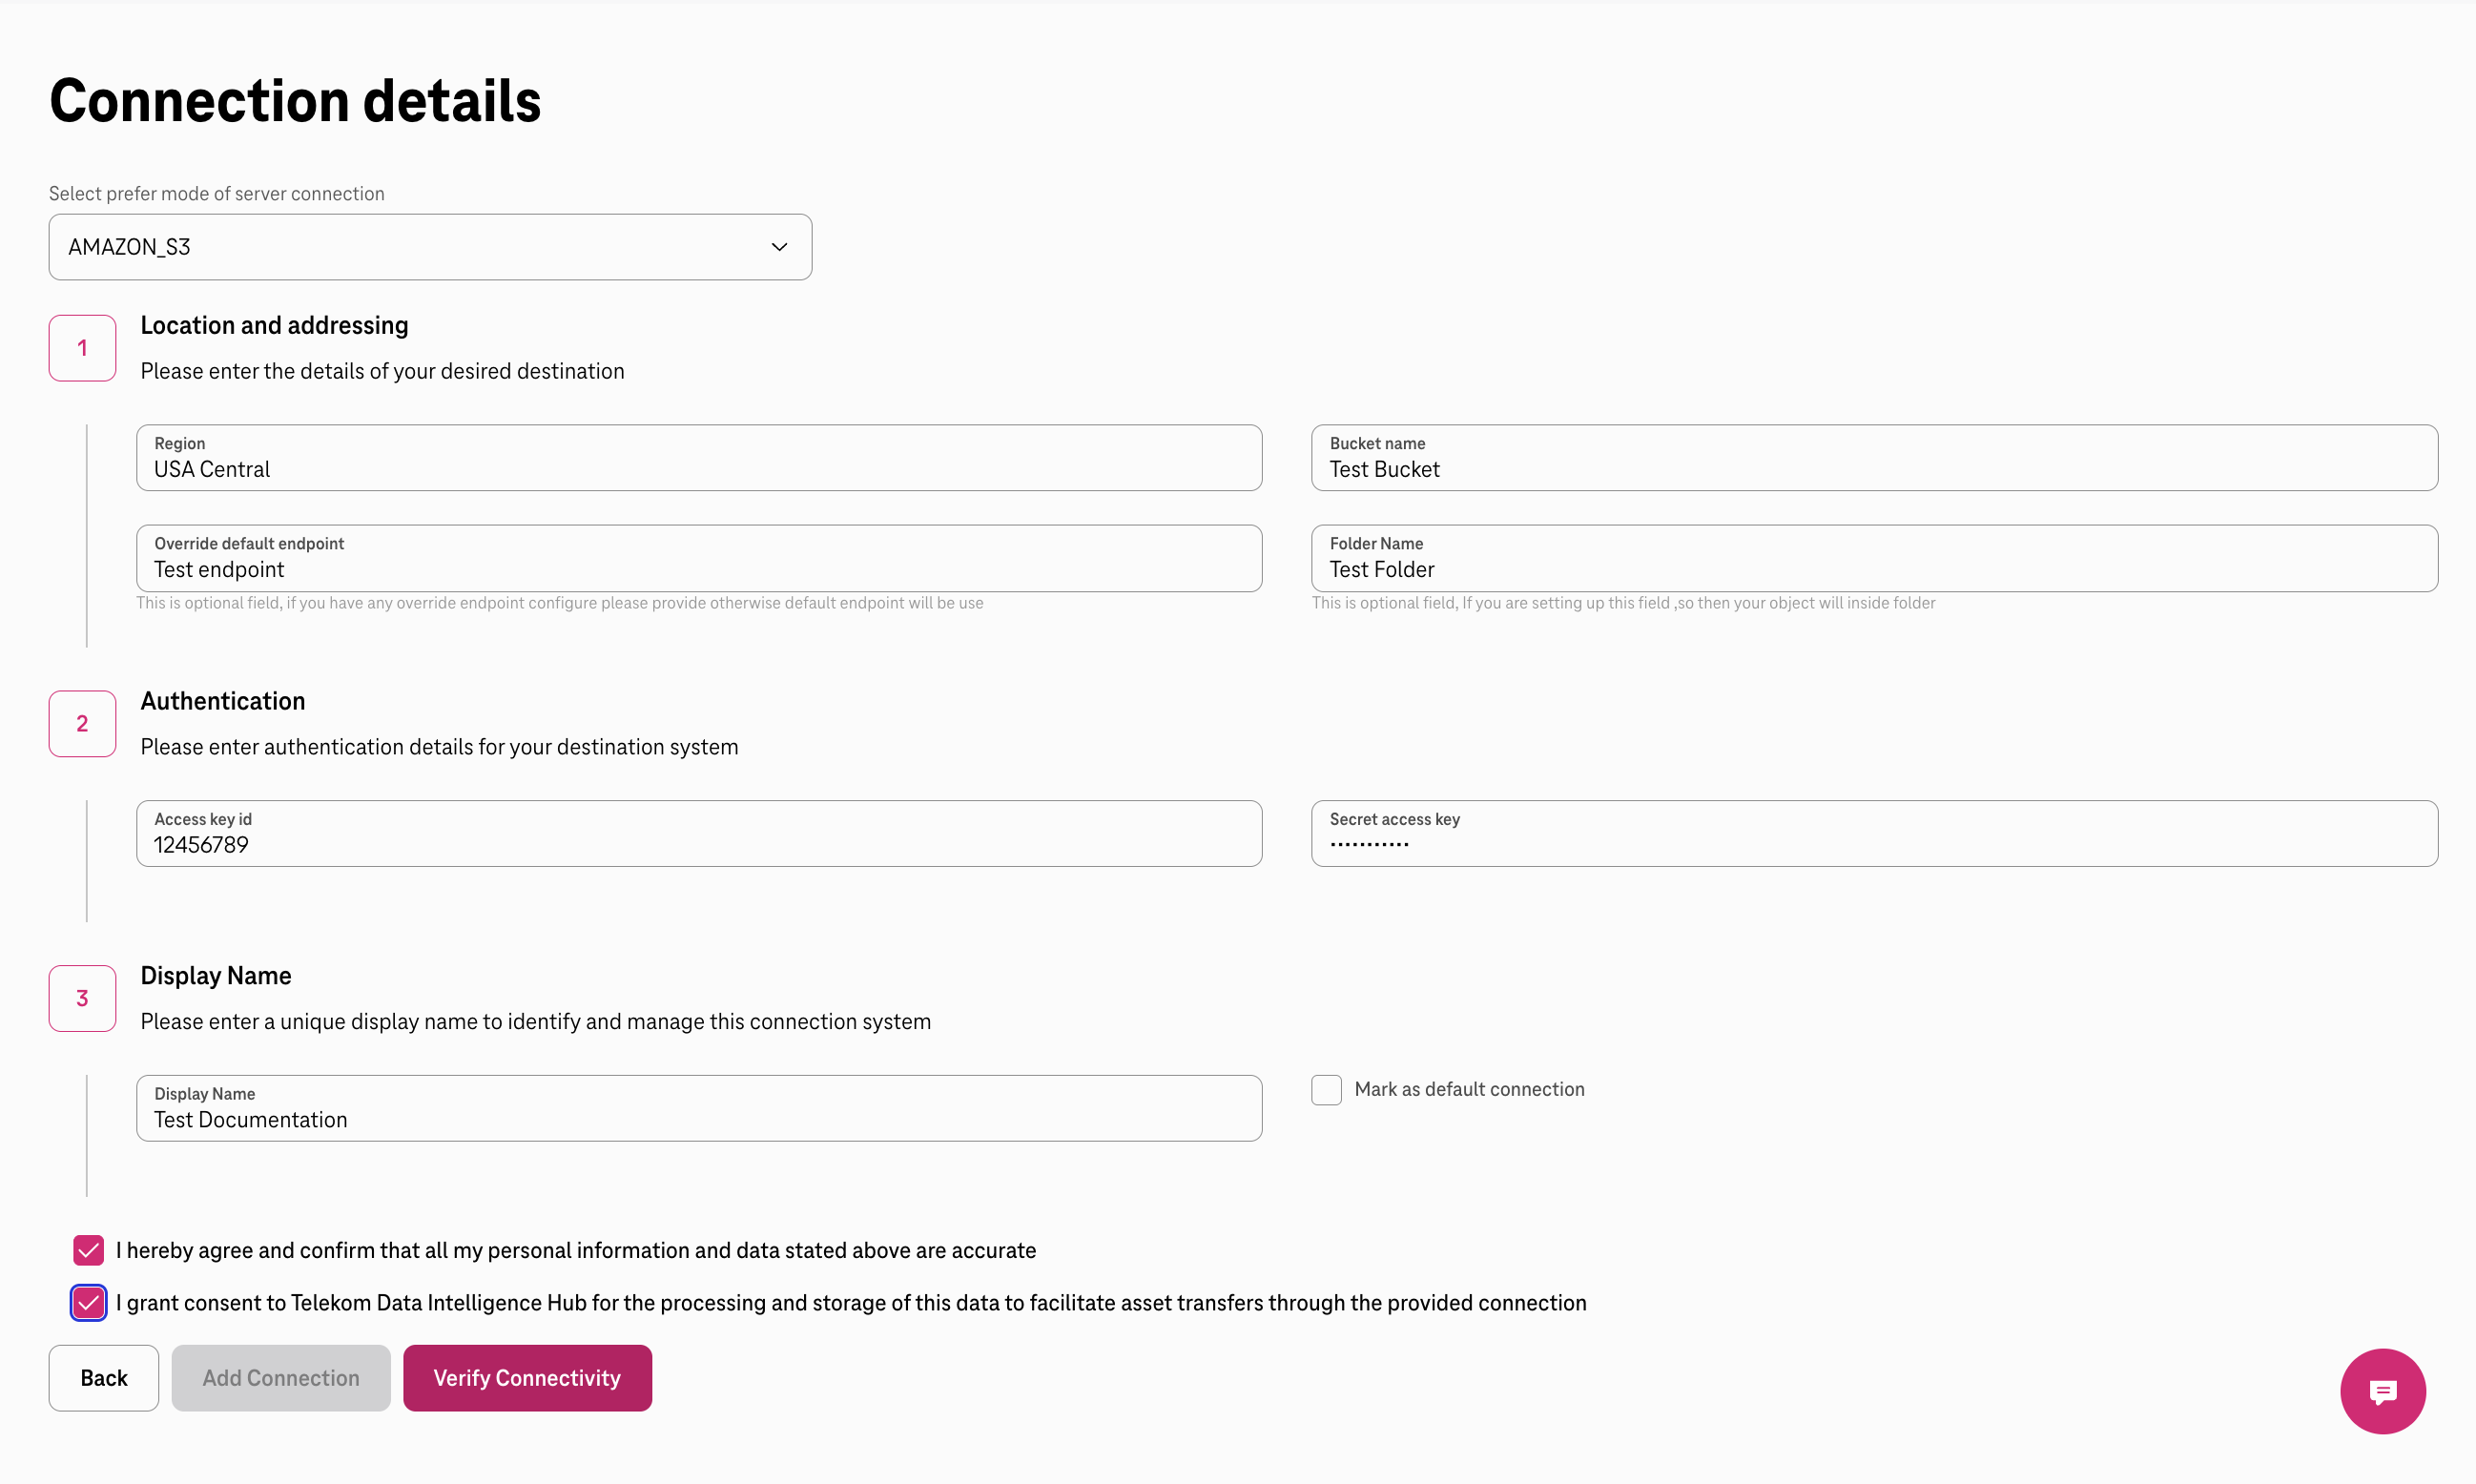
Section titled “Configure your external connection”Once the connection type is selected, you will be able to view a form, which requires several fields to be filled up in order to define the connection system fully. These details are necessary for Telekom Data Intelligence Hub to establish connectivity so that successful data transfers can take place.
Section 1: Location & Addressing
Section titled “Section 1: Location & Addressing”This section requests information for needed to be filled to establish correct connection:
- AWS instance region
- S3 bucket name where the data is stored or needs to be stored
- (Optional) Override Default Endpoint
- Folder name - please make sure this is a correct and exact name as it is in your S3 bucket otherwise the data exchange will not work.
Section 2: Authentication
Section titled “Section 2: Authentication”To ensure connection, next step requires authentication details to autheticate and give permission to use this folder as the data source/sink for data exchange. Please enter:
- Access key ID
- Secret access key
Section 3: Display Name and Saving the connection
Section titled “Section 3: Display Name and Saving the connection”Finally, you can opt to designate a unique “Display name” for this connection, facilitating its differentiation from other connections set up within your organization account. It’s crucial to recognize that these connections are available to any user within your organization. Additionally, you have the choice to designate this connection as the default, aiding to swift selection for future usage.
Please check the checkboxes below to confirm and save this connection for your organization account. These selections are mandatory and necessary to obtain user consent for storing and processing the connection details.
Verify and add/save your connection
Section titled “Verify and add/save your connection”Upon clicking “Verify,” we will assess the reachability to your configured connection. Only upon successful verification will users be able to “Add” or “Save” this connection for future use. Once you can see “Connection verified”, please click on “Add” (while adding new connection) or “Save” (while editing exisiting connection) to save the connection.
You can now see the connection in the overview page and a “success” notification. Now this connection is ready to use for data transfers.
You can also “delete” or “edit” any connection from this overview page.
For Azure Blob Storage
Section titled “For Azure Blob Storage”Create your external connections
Section titled “Create your external connections”Navigate to “Manage” section and click on “New Connection”. Here you can view all the connections that have been defined by various users of your organization.
From the given dropdown, select your preferred type of connection. In this example, we will select “Azure Storage” connection and define and configure it in next steps.
Configure your external connection
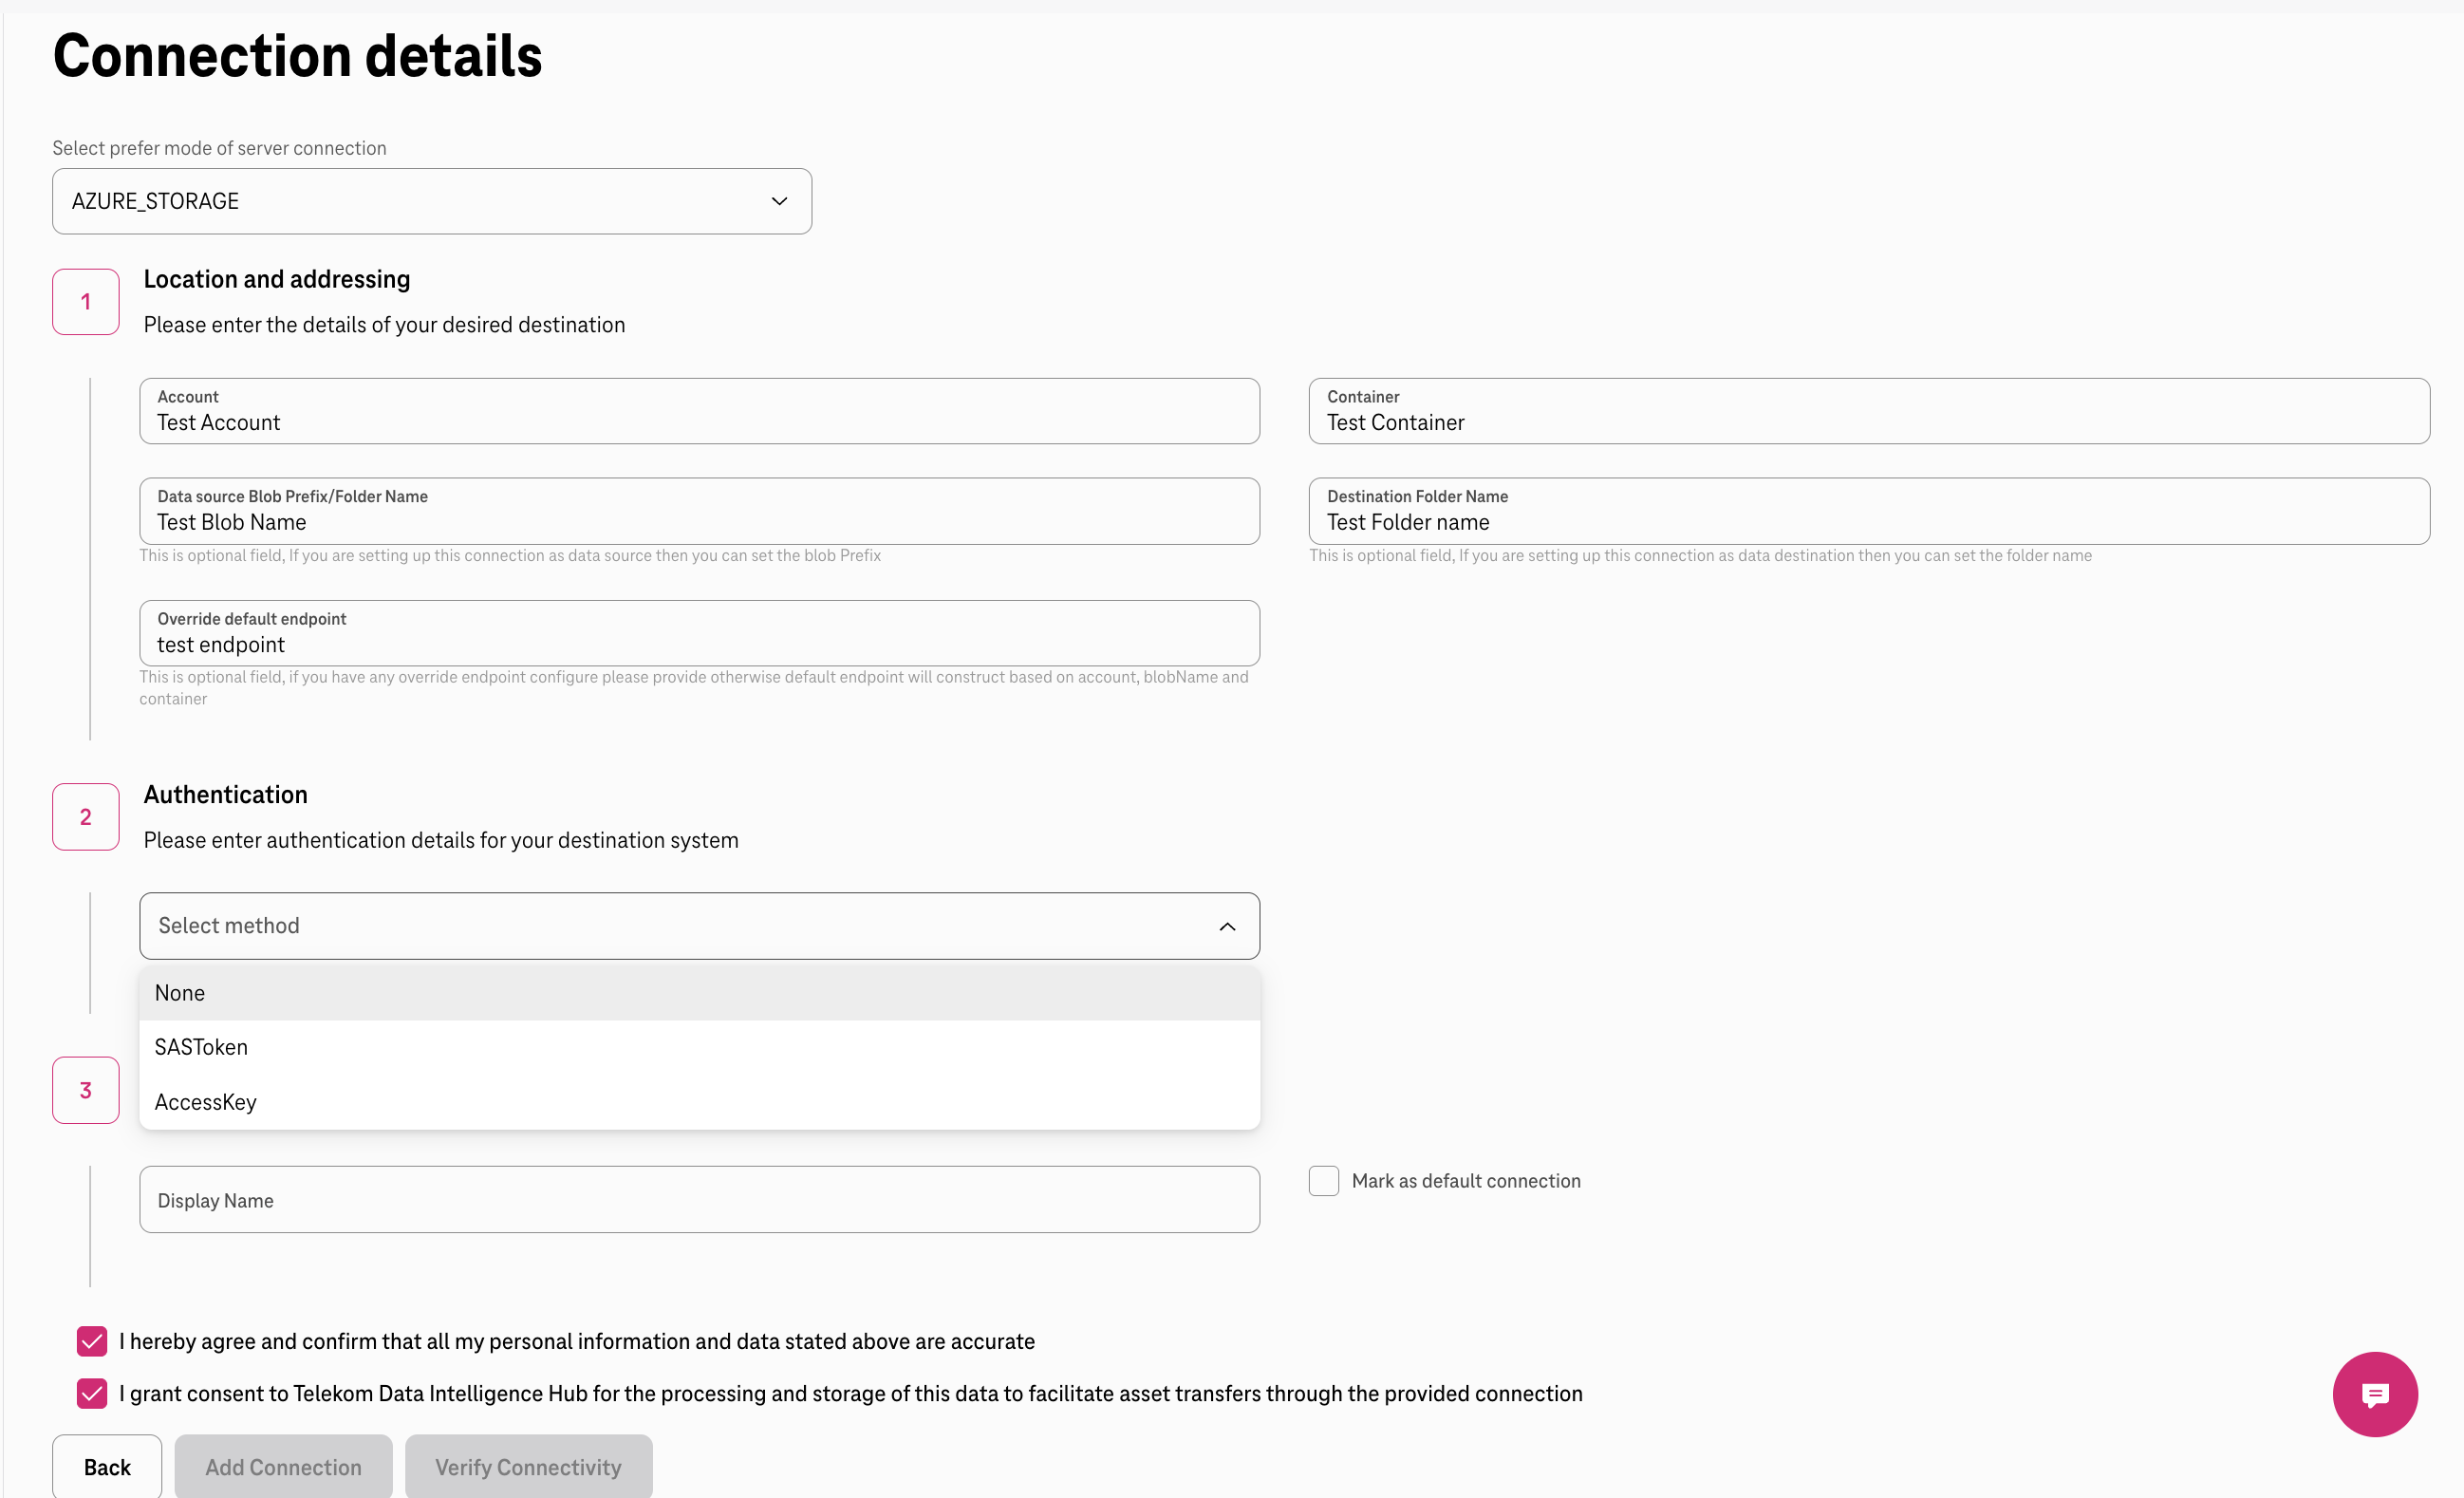
Section titled “Configure your external connection”Once the connection type is selected, you will be able to view a form, which requires several fields to be filled up in order to define the connection system fully. These details are necessary for Telekom Data Intelligence Hub to establish connectivity so that successful data transfers can take place.
Section 1: Location & Addressing
Section titled “Section 1: Location & Addressing”This section requests information for needed to be filled to establish correct connection:
- Account name
- Container name
- Data source Blob Prefix/Folder name - please make sure this is a correct and exact name as it is in your Azure Blob otherwise the data exchange will not work.
- Destination Folder name - where the actual files are stored. please make sure this is a correct and exact name as it is in your Azure Blob otherwise the data exchange will not work.
- (Optional) Override Default Endpoint
Section 2: Authentication
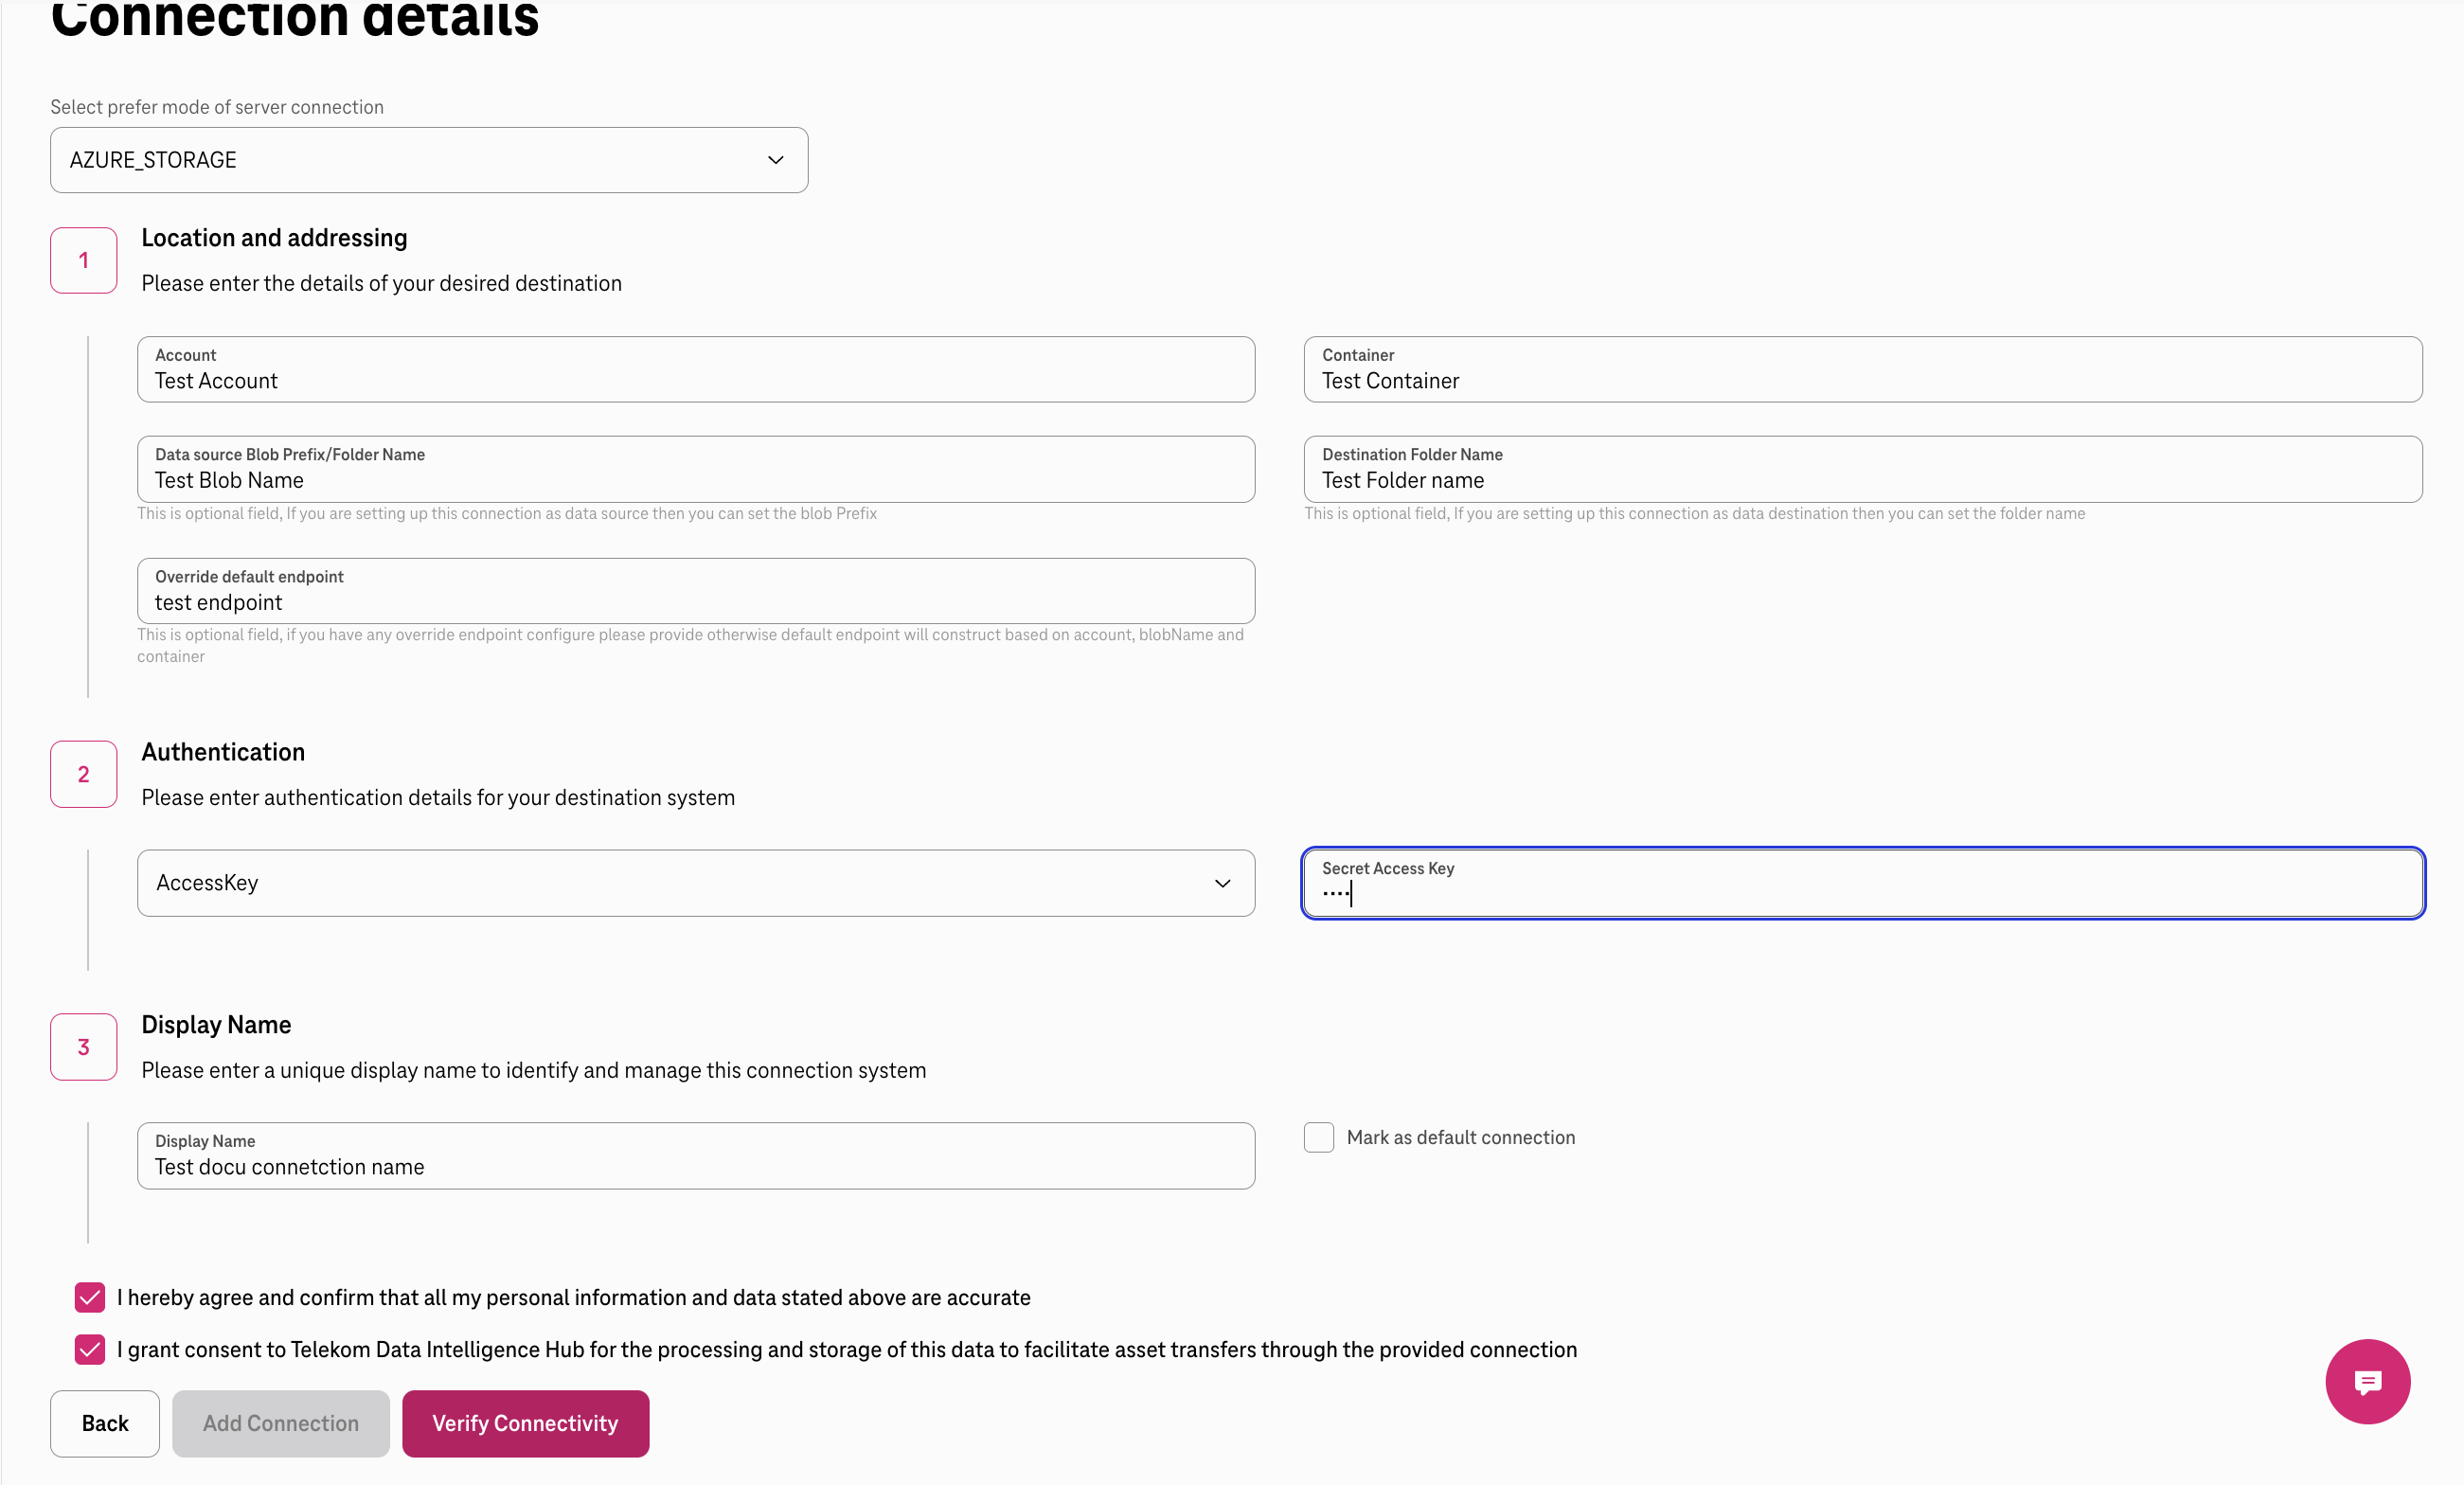
Section titled “Section 2: Authentication”To ensure connection, next step requires authentication details to autheticate and give permission to use this folder as the data source/sink for data exchange. You can choose any of the following method for authentication:
- Access Key Authentication
- SAS Token Authentication
Please see below for more details on how to set up the authentication.
Access Key Authentication:
Section titled “Access Key Authentication:”Please fill in the following keys to enable authentication and connection to the blob storage:
- Access Key ID
- Secret access key

SAS Token Authentication
Section titled “SAS Token Authentication”In case you are using SAS Token Authentication, please fill in the following keys to enable authentication and connection to the blob storage:
- SAS Token ID
- Expiration Info
- (Optional) EDC Type information to attach to a specific type of info on EDC

Section 3: Display Name and Saving the connection
Section titled “Section 3: Display Name and Saving the connection”Finally, you can opt to designate a unique “Display name” for this connection, facilitating its differentiation from other connections set up within your organization account. It’s crucial to recognize that these connections are available to any user within your organization. Additionally, you have the choice to designate this connection as the default, aiding to swift selection for future usage.
Please check the checkboxes below to confirm and save this connection for your organization account. These selections are mandatory and necessary to obtain user consent for storing and processing the connection details.
Verify and add/save your connection
Section titled “Verify and add/save your connection”Upon clicking “Verify,” we will assess the reachability to your configured connection. Only upon successful verification will users be able to “Add” or “Save” this connection for future use. Once you can see “Connection verified”, please click on “Add” (while adding new connection) or “Save” (while editing exisiting connection) to save the connection.
You can now see the connection in the overview page and a “success” notification. Now this connection is ready to use for data transfers.
You can also “delete” or “edit” any connection from this overview page.
For OFTP2 Protocol
Section titled “For OFTP2 Protocol”COMING SOON
Next steps: How to use in Connect & Integrate
Section titled “Next steps: How to use in Connect & Integrate”Now since you have created a successful external connection, the saved connections can directly be used in the Connection & Integrate application for both Provide and Consume journeys. Please use the following links to:
Quick Links
Section titled “Quick Links”Please follow to access all quick links for Connect & Integrate quick access links